
Since the inception of the Web, data is piled up on the public domains, which is like a gold mine for data aggregators and data analysts.
Many companies are crawling the data for research, data modelling, forecasting etc., use cases that are essential for the present and future growth of the business around the world.
Data Scraping should be doing with the right tool and dedicated private proxy integration with the webharvy.
What is WebHarvy software?
WebHarvy is a windows based software with an easy-to-use user interface like Microsoft excel, That you can use to do the web scraping of the HTML pages, images, URLs and emails around the world wide web.
However, It provides extensive functionalities like proxies support, exporting your data into various formats like Excel, XML, CSV, JSON or TSV file and directly into SQL database.
In fact, it supports JavaScript for modern websites those are built on SPA stacks.

How to Integrate Proxy-Hub Proxies with WebHarvy?
1: First, You have to download the software from their download page and install it.
2: Afterwards, Open the software and navigate to Home > Settings; see below.

3: Once you are settings options, Go to the Proxy Settings tab and
click the check box which says, “Enable network connection via the Proxy server.”
See the Example IP Adding:

3.1: Type is the Protocol for the proxy server as it supports
HTTP, HTTPS, SOCKS 4, and SOCKS 5.
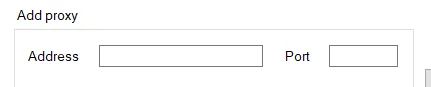
3.2: Add proxy server now in the fields:
Address and Port
3.3: Although some proxy servers require authorization via the username and password,
you can enter those in the username and password fields.
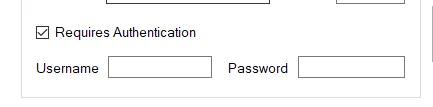
Note: Not all proxy servers require user/pass authorization.
You can use IP auth in our private proxy service, so no auth is require on that specific ISP IP address you authorize.
Lastly, Add your proxy server by clicking “Plus icon you see”.

Importing Proxies from a file:
It has an option to import your proxy server from the file by this option:

4: Lastly, There is an option to rotate the proxy every X minutes you can do this by clicking “Rotate Proxy” and setting the number of minutes right after it.

Finally, the Configuration is done now.
Summary
Data collection is a task that requires an updated script or software that keeps making changes according to the websites. For that webharvy is one of the tools available to perform the data scraping.
This guide walks you through the Proxy setup into Webharvy, and for any questions, you can contact us via email or chat support.